Among the top revenue models, In-app purchases (IAPs) have become a powerful way to monetize mobile applications without scaring away users with high upfront costs. Whether you’re building a fitness app or a premium productivity tool, offering in-app purchases can create a seamless revenue stream while improving user engagement.
So, if you’re also wondering how to implement in-app purchases in iOS and Android applications, you have come to the right place. In this blog, we will walk you step by step through the process to help you gain important knowledge about in-app purchases. So, let’s get started:
What Are In-App Purchases?
In simple words, in-app purchases let users buy content, services, or features inside your application. Here are a few examples of in-app purchases:
- Buying coins or gems in a mobile game
- Unlocking premium features in a free app
- Subscribing to monthly or annual plans for exclusive content
The in-app purchases are popular among businesses because they lower the barrier to entry while giving users options to pay for more value later.
Types of In-App Purchases
Before taking a deep dive into the technical steps related to the In-app purchases, let’s clarify the main types of in-app purchases you can offer:
1. Consumable Purchases
These are the items that users can buy, use, and repurchase. The top examples are game currency, extra lives, and credits.
2. Non-Consumable Purchases
These are the permanent purchases that unlock content or features. The top examples are removing ads, unlocking a pro version.
3. Subscriptions
These IAPs provide auto-renewing access to features or content. For example, monthly access to exclusive workouts or premium content.
Talking about different platforms (iOS and Android), they handle these categories a bit differently, and that’s why you need to pay attention to important guidance and APIs.
Step-by-Step Guide to In-App Purchases in iOS
With businesses getting confused between iOS vs Android, it’s important to break down the process separately for every platform. Let’s begin with iOS. Apple’s in-app purchase framework is StoreKit:
1. Set Up Your App in App Store Connect
- Sign in to App Store Connect.
- Navigate to My Apps, choose your app, and select the Features tab.
- Click the + button under In-App Purchases.
- Select the type of IAP (consumable, non-consumable, or subscription).
- Enter the product information: Reference Name, Product ID (unique identifier), Pricing, Description
Tip: Keep product IDs plain and unambiguous. Upload screenshots (particularly necessary for subscription products). Save and submit for review.
2. Enable In-App Purchase Capability
The second step in the process includes:
- In Xcode, choose your project.
- Proceed to Signing & Capabilities.
- Enable the In-App Purchase capability.
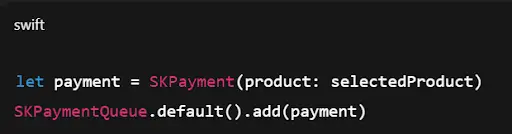
3. Integrate StoreKit into Your App
Utilize StoreKit APIs to:
- Retrieve available products (SKProductsRequest)
- Show choices to the user
- Trigger a purchase (SKPaymentQueue)
- Process transactions and receipts
Example snippet:
4. Test Your In-App Purchases
- Use Sandbox accounts to test purchases without actual charges.
- On your test device, sign out of the App Store and sign in using your Sandbox Apple ID.
- Test all flows: buying, restoring, and error handling.
5. Validate Receipts
Apple suggests validating receipts locally or on your server. This will ensure purchases and minimize fraud.
Step-by-Step Guide to Setting Up In-App Purchases on Android
Android in-app billing is managed through the Google Play Billing Library.
1. Set Up Your Products in Google Play Console
- Sign in to Google Play Console.
- Choose your app and navigate to Monetize > Products.
- Select In-app products.
- Click Create product.
Enter details:
- Product ID
- Name and description
- Pricing
- For subscriptions, configure billing intervals and free trials.
Tip: Once you create a product ID, you can’t reuse it, so name them carefully.
2. Integrate Google Play Billing Library
Add the dependency to your app’s build.gradle:

3. Link Your App to Google Play
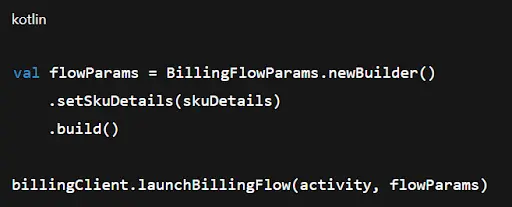
Use the BillingClient API to:
- Create a connection.
- Query products available.
- Start the billing flow.
- Process purchases.
Example snippet:
4. Handle Purchase Updates
Use PurchasesUpdatedListener to receive callbacks when purchases succeed or fail.
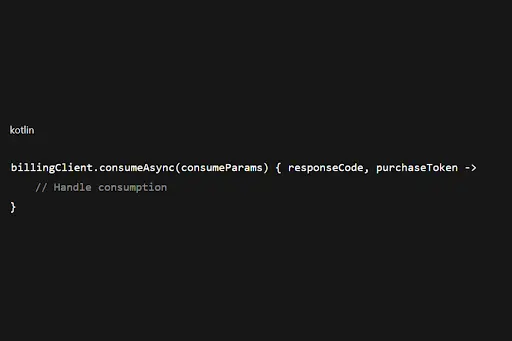
5. Acknowledge or Consume Purchases
Consumable purchases have to be consumed, and non-consumables and subscriptions have to be recognized. Google Play will refund purchases that aren’t recognized within three days.
Example:
6. Test In-App Purchases
- Employ license test accounts in Play Console.
- Install your application through an internal test track.
- Test all of your purchase flows.
Best Practices for In-App Purchases
The following are some guidelines to assist you in avoiding typical pitfalls. You need to keep these best practices in mind before focusing on In-App Purchases. These best practices are:
- Be Transparent: Always display transparent pricing and what the users receive before payment.
- Handle Errors Gracefully: Network problems and transaction failures do occur, but you need to ensure your app doesn’t crash.
- Offer Restore Options: Enable purchases to be restored by users upon reinstall or device change.
- Keep UI Simple: Design purchasing to be intuitive and frictionless.
- Respect Refund Policies: Apple and Google have strict rules, so you need to remain compliant.
Common Pitfalls to Avoid
Just like avoiding the common mobile app development mistakes, you need to avoid some common pitfalls. Many individuals make mistakes while making in-app purchases, and it’s important to avoid them to complete the process seamlessly. These common pitfalls are:
- Avoid Hardcoding Product IDs Everywhere: Instead, define them once in one location so you can easily change or translate.
- Leaving Receipt Validation: Skipping this step invites fraudulent purchases.
- Forgetting Testing: Test all cases always, such as failed payments, cancellations, and restoring purchases.
- Overlooking Local Laws: Data privacy legislation (such as GDPR) and tax laws might influence how you process transactions.
Even with the best intentions, it’s easy to run into trouble when setting up in-app purchases. Small oversights can turn into big headaches later, like missing receipts, confused users, or failed transactions. Remember to avoid these mistakes to save time and frustration.
Final Thoughts
Setting up in-app purchases in iOS and Android isn’t too much complex. You need to follow the right approach to create a smooth, secure experience for your users while building a reliable revenue stream. However, it’s important for you to choose the right type of purchase, follow proper guidelines, test thoroughly before going live, and keep your users’ trust by being clear and fair. So, start today to scale your business using your application.